Categories
Blog Education

7 Continuation Patterns to Know

Understanding continuation patterns can help you complete a successful trade since many technical traders use them to understand the psychology of buyers and sellers.  Let’s take a look at defining a continuation pattern, learning how to use them in trading and also going over the most popular ones.

What is a Continuation Pattern?

The definition of a continuation pattern is a trend that shows a temporary change in behavior that will eventually go back to continue the existing trend.  In other words, an uptrend that temporarily changes direction to go sideways for awhile that then goes back to an uptrend. The same thing would be true of a downtrend.  Typically these temporary changes are times of consolidation in which a stock moves mostly sideways instead of up or down.

How do I use them in trading?

As with any trading pattern you want to be able to identify them and understand what they mean so you will have a better idea of what could happen with the individual stock.  Whether you are a strong technical trader or not, it’s important to know the process by which other traders function. When you know that different patterns mean that a stock will likely continue up or down, you will know what others traders are looking for to base their buying / selling decisions.

Which ones should I know?

There are 3 basic types of continuation patterns that every technical trader should know.  As is typical in trading, each of the types has different variations that you should learn.  For example, there is a Flag pattern and also a Pennant pattern. While they are both similar, they have different meanings and points to consider before using them in your analysis.

Typically, while each variation is similar, they often have contrasting meanings.  Normally, one is found in an uptrend and the other in a downtrend. This leads the technical analyst to derive different entry and exit points depending on whether they are buying or selling.

Now, let’s take a look at the different patterns and review each in more detail.

Flag / Pennant

Explanation of Pattern

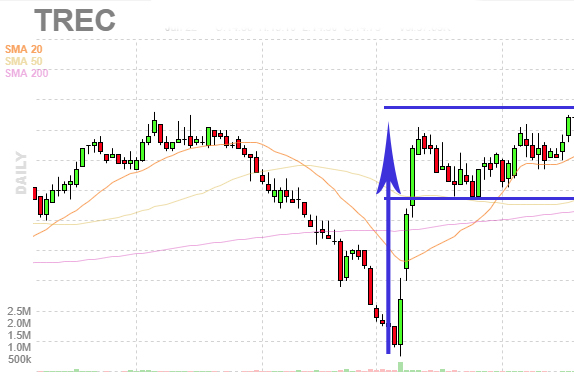
A flag chart pattern is formed when a stock consolidates in a narrow range after a sharp move.  The pattern looks like a flag because the consolidation (a small rectangle) is connected to the large and fast move (pole).

While a Pennant is a bit different because it is formed when a stock consolidates in a converging range after a sharp move.  The pattern looks like a pennant because the consolidation (symmetrical triangle) is connected to the large and fast move (pole).

Points to Consider

The flag portion of the pattern must run between parallel lines.  It can either be slanted up, down or sideways.

Flags that angle in the same direction as the previous move (example: pole up and flag slants up), minimizes the outcome of the pattern. Therefore, you really want to see a sharp move up followed by a sideways / slightly angled down range. Or, a sharp move down followed by a sideways / slightly angled up range.

The pennant portion of the pattern must run between converging lines.  It should be sideways or neutral. The price action should just be contained between the converging trend lines.

For both the flag and pennant pattern, the move before the flag/pennant part (the pole) must be a sharp move, nearly straight up, and be noticeably bigger and faster than the recent price moves. This fast and quick price movement shows strong buying/selling action…which we hope to profit from.

Example

flag-pattern-example

Symmetrical Triangle

Explanation of Pattern

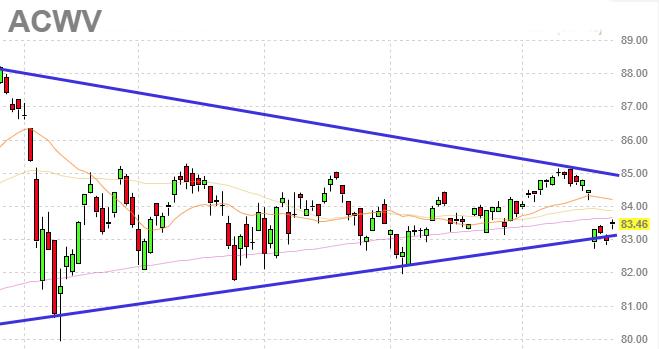
A triangle pattern, regardless of whether it’s balanced / ascending / descending is a set of converging lines formed from the support and resistance lines on a stock.  The way the lines are going to meet determines what type of triangle pattern is created. For the pattern to be considered symmetrical, it would show that the support line and the resistance line converge in the middle of the high/low.

Points to Consider

The price target for a breakout or breakdown from a symmetrical triangle is equal to the distance from the high and low of the earliest part of the pattern applied to the breakout price point.

The stop loss for the symmetrical triangle pattern is often just below the breakout point.

Example

symmetrical-triangle-example

Ascending / Descending Triangle

Explanation of Pattern

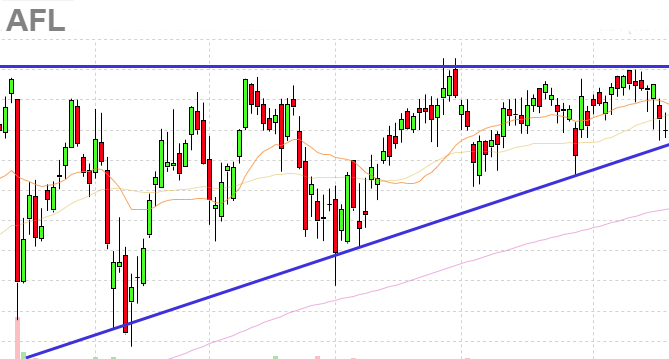
Two variations of the symmetrical triangle pattern are the ascending and descending triangle patterns. Ascending triangles have a horizontal upper trend line, with a rising lower trend line, which predicts a potential breakout higher.  Descending triangles are the opposite with a horizontal lower trend line, and a falling upper trend line, predicting a potential breakdown lower.

Points to Consider

Focus more on breakouts to the upside during uptrends and breakouts to the downside during downtrends.

Example

ascending-triangle-example

Channel (Up / Down)

Explanation of Pattern

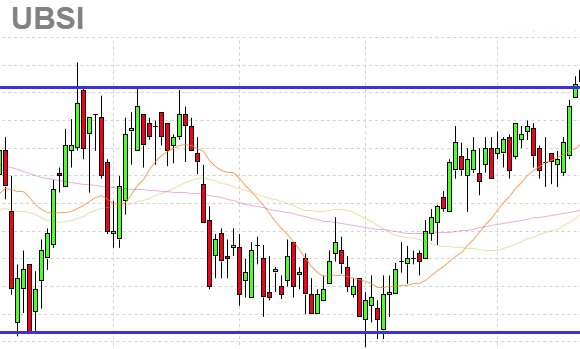
A channel pattern is created when the support line and resistance line are parallel to each other.  This typically happens during a consolidation phase where the stock becomes range bound with the general high and low of the days (or at least the opening and closing of the days) remaining consistent for a period of time.

Points to Consider

If the Channel rises – which is to say that it is setting higher highs and higher lows, then it’s considered an Up Channel.  However, if the opposite is true – a stock is setting lower highs and lower lows, then it’s forming a Down Channel. Each of these give different buy and sell signals and are important to consider when you are wanting to go long or short on a stock.

Example

channel-example

Review

Now that you’ve learned about Flags / Pennants, Triangles and Channels you should be more confident in your trading.  Knowing that Flags and Pennants are formed after a strong move will help you identify the possible formation. Seeing an ascending triangle on a chart can help you predict where a stock might breakout or breakdown.  Finally, when you notice a channel forming, you can tell that a stock is going to be stuck consolidating for a length of time.

By understanding the differences in the patterns, as well as the psychology behind each one, you should be positioned to benefit when one of these patterns shows themselves on the charts of your favorite stocks.

Additional Viewing Options:

Would you like to view a video or presentation on this topic?

Check out this video on Youtube 

Download the presentation on SlideShare 

Categories
Blog Education

Double Bottom Reversal Pattern

When trends change from bearish to bullish (or vice versa) there are indicators that the seasoned trader is looking for.  The Double Bottom Reversal marks a medium or long-term change in trend. The reversal is from bearish to bullish. Keeping an eye out for possible fake moves, there are six different points that happen for the pattern to be confirmed.  Let’s take a look at each of those points using a May 2018 chart of GVA.

example of a double-bottom pattern

The Setup

As with all reversals, a trend must already be taking place.  The longer the trend, the more substantial the double bottom reversal could be.  In this case, the stock should be trading in an downtrend (bearish trend).

double-bottom-downtrend example

Pattern Details

Here’s how the double-top pattern is created and the specific points you want to look out for during formation and to confirm that the pattern is complete.  Look for the 1st Top, a Decline that turns around and leads to a 2nd Top, followed by a decline, support breakdown that turns to resistance and increased volume.  Let’s look at each of these in more detail.

1st Bottom

Stocks commonly hit a new low and retreat. That in itself is nothing new. In the case of the reversal pattern, a new low should be hit and a retreat happen.  Since this happens in stocks all time, it doesn’t mean much by itself.

double-bottom-first-bottom example

Increase

If the retreat from the low is 10% or more and then turns back to the negative, you may be on your way to witnessing the formation of a double bottom pattern.  Not every high that happens is a one-bar occurence so don’t be fooled by a multiple session high that eventually turns negative and starts to fall back down to the previous low.

double-bottom-increase example

2nd Bottom

Once the stock falls to the previous low, it is expected to meet with support.  Since this is common, it doesn’t mean that you have a double-bottom forming – it only means you are one step closer.  Typically, the second bottom isn’t exactly the same low as before. A variation of around 3% is close enough.

double-bottom-second-bottom example

Increase from Bottom

As the stock starts to rise from the second bottom, you should notice an increase in volume.  This increase will tell you that the bulls are gaining strength and will be testing the previous resistance soon.

double-bottom-increase-from-bottom example

Resistance Breakdown

Once the stock rises to the previous resistance level, the pattern still isn’t complete.  You still need to have an increase in volume and a faster gain than normal. Once the stock breaks through resistance and heads higher, the pattern is complete.

double-bottom-resistance-breakdown example

Resistance Turned Support

As happens in stock trading, resistance that is broken becomes support for the future.  During the formation of the pattern, a stock will sometimes fall to test the new support – which will give a trader another chance to get out of a bad position or to start a new long position in the stock.

double-bottom-resistance-turned-to-support example

Now What?

If you decide to take a new long position because of the break of previous resistance, then you should do some quick math to find your possible future exit price.  Typically, the distance from the break of resistance down to the bottom of the pattern will tell you how high you could expect the stock to rise. As in all stock trading this is only an approximation and other factors should be included in calculating your exit price in your trading plan.

Final Thoughts

To wrap this all up, it’s important to make sure that the stock you think is forming a double bottom meets the six criteria.  It should be in a long downtrend, hit a first bottom then rise, hit a second bottom then rise and break the previous resistance area with increased volume.  If all of that happens, you could expect that the trend has been reversed and will continue up in the future.

Additional Viewing Options:

Would you like to view a video or presentation on this topic?
Check out this video on Youtube
Download the presentation on SlideShare
Categories
Blog Education

Double Top Reversal Pattern

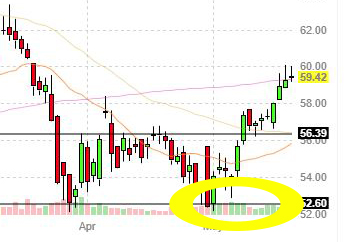
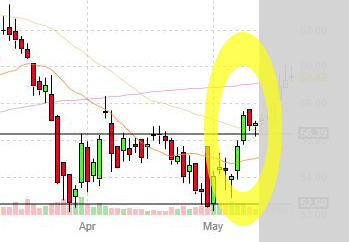
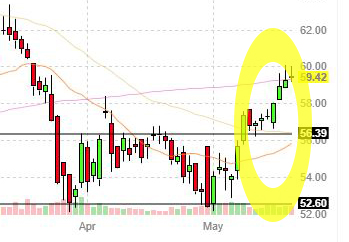
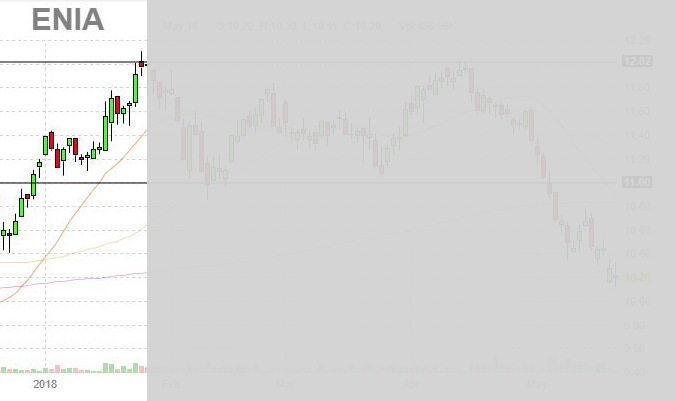
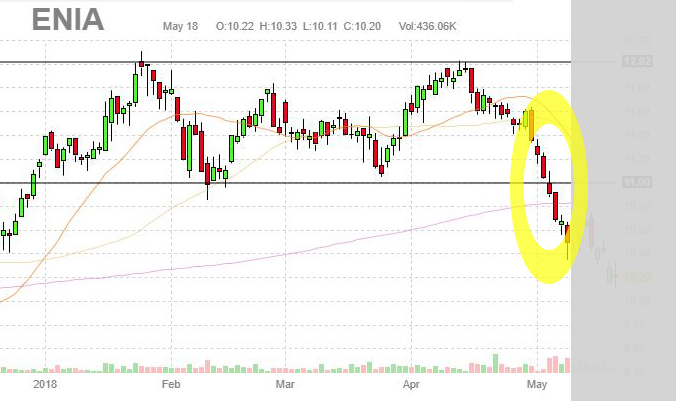
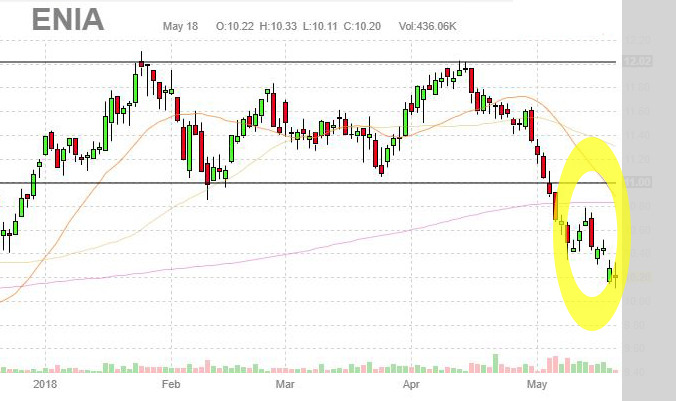
When trends change from bullish to bearish (or vice versa) there are indicators that the seasoned trader is looking for.  The Double Top Reversal marks a medium or long-term change in trend. The reversal is from bullish to bearish. Keeping an eye out for fakeouts, there are six different points that happen for the pattern to be confirmed.  Let’s take a look at each of those in more detail using a May 2018 chart of ENIA.

The Setup

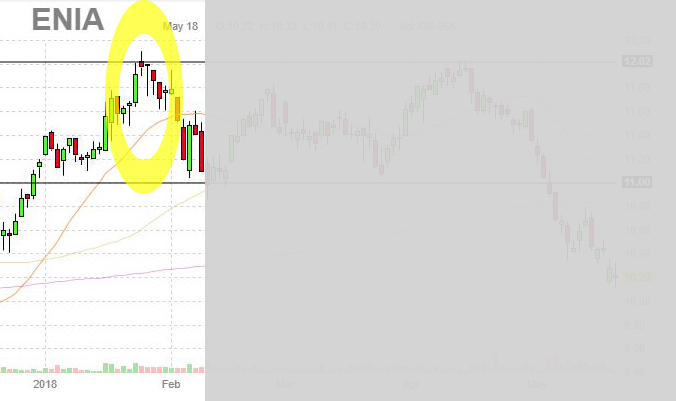
As with any reversal, a trend must already be in place.  The longer the trend, the more substantial the double top reversal could be.  In this case, the stock should be trading in an uptrend (bullish trend).

double-top-uptrend

Pattern Details

Here’s how the double-top pattern is created and the specific points you want to look out for during formation and to confirm that the pattern is complete.  Look for the 1st Top, a Decline that turns around and leads to a 2nd Top, followed by a decline, support breakdown that turns to resistance and increased volume.  Let’s look at each of those in more detail.

1st Top

Stocks commonly hit a new high and retreat. That in itself is nothing to write home about. In the case of the reversal pattern, a new high should be hit and a retreat happen.  Since this happens in stocks all time, it doesn’t mean anything by itself.

double-top-first-top

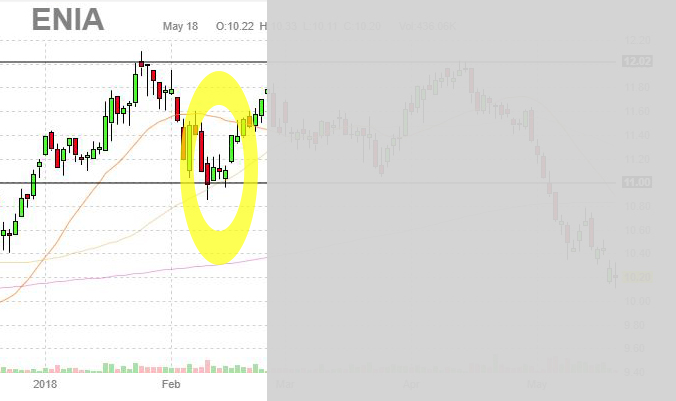
Decline

If the retreat from the high is 10% or more and then turns back to the positive, you may be on your way to witnessing the formation of a double top pattern.  Not every low that happens is a one-bar occurrence so don’t be fooled by a multiple session low that eventually turns positive and starts to climb back up to the previous high.

double-top-decline

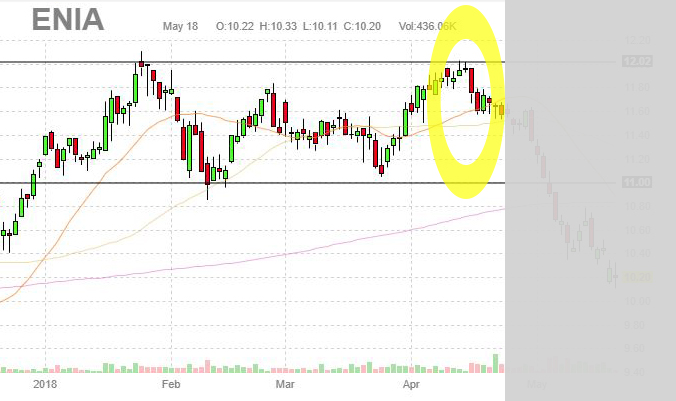
2nd Top

Once the stock climbs to the previous high, it is expected to meet with resistance.  Since this is common, it doesn’t mean that you have a double-top forming – it only means you are one step closer.  Typically, the second top isn’t exactly the same high as before. A variation of around 3% is close enough.

double-top-second-top

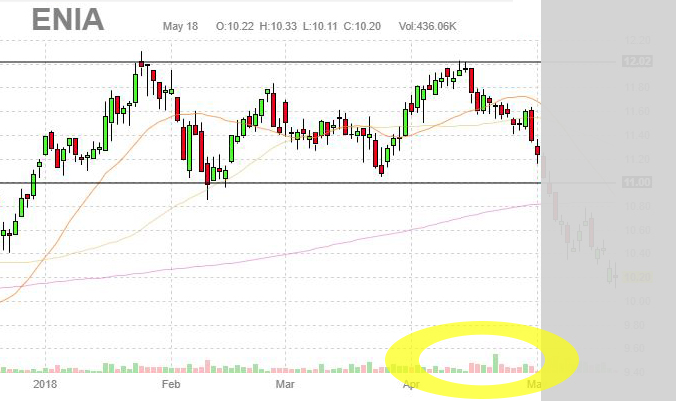
Decline from Top

As the stock starts to drop from the second top, you should notice an increase in volume.  This increase will tell you that the bears are gaining strength and will be testing the previous support soon.

double-top-second-decline

Support Breakdown

Once the stock falls to the previous support level, the pattern still isn’t complete.  You still need to have an increase in volume and a faster drop than normal. Once the stock breaks through support and heads lower, the pattern is complete.

double-top-support-breakdown

Support Turned Resistance

As happens in stock trading, support that is broken becomes resistance for the future.  During the formation of the pattern, a stock will sometimes rise to test the new resistance – which will give a trader a chance to either get out of a position or to start a new short position in the stock.

double-top-support-turned-to-resistance

Now What?

If you decide to exit your trade because the double-top is complete then you are done.  If, however, you decide to take a new short position because of the break of previous support, then you should do some quick math to find your possible future exit price.  Typically, the distance from the break of support up to the top of the pattern will tell you how low you could expect the stock to fall. As in all stock trading this is only an approximation and other factors should be included in calculating your exit price in your trading plan.


Final Thoughts

To wrap this all up, it’s important to make sure that the stock you think is forming a double top meets the six criteria.  It should be in a long uptrend, hit a first top then decline, hit a second top then decline and break the previous support area with increased volume.  If all of that happens, you could expect that the trend has been reversed and will continue down in the future.


Additional Viewing Options:

Would you like to view a video or presentation on this topic?
Check out this video on Youtube
Download the presentation on SlideShare
Categories
Blog Education

How to Set an OCO Bracket

So you have your stock purchased, but your trading plan says that you should set a Stop price that you would want to sell at if the price reaches it.  While you’re at it, you want to put in a Sell Limit at the upper price that you want to sell at if the price reaches it. What you want to do is set up an OCO Bracket – otherwise known as a One Cancels Other Bracket.

3 Easy Steps to Create an OCO Bracket

Using TD Ameritrade, it’s actually simple to enter the order that will either sell at the top when your target price is hit, or stop out at the bottom if the trade turns against you.  There are just 4 steps to walk through to get the order setup.

  1. Search for your stock
  2. Create a closing order
  3. Adjust the price points
  4. Walk Away knowing you are covered

Now that you know the steps, let’s walk through them in a bit more detail.

Step 1 – Search for Your Stock

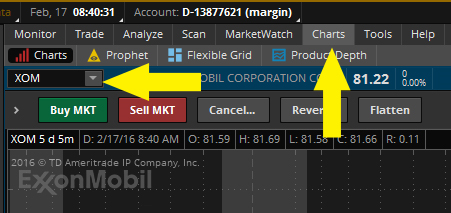
In the entry space for the search box, type the ticker symbol for the stock you want to setup the order around.

search-for-stock

Step 2 – Create a Closing Order

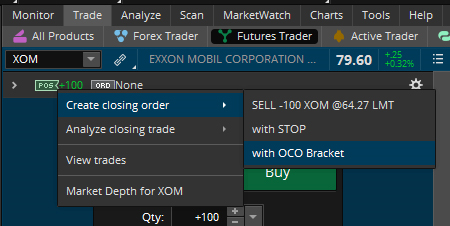
Right click on the “POS” indicator, choose “Create closing order” and then “with OCO Bracket”

save-closing-order

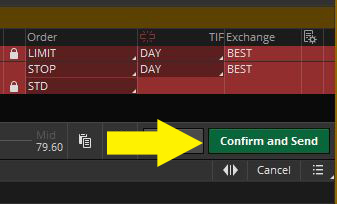
When the box for your order displays, click on “Confirm and Send” button to accept the defaults for the change in order.  You will make updates to it in the next step.

confirm-and-send

Change your view to the Chart tab and search for the stock you are working with.

search-for-stock-again

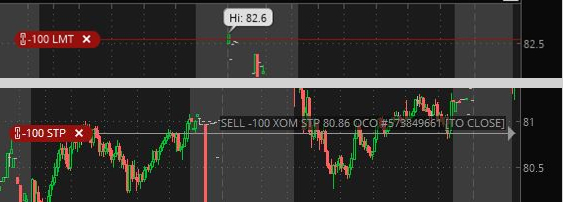
Now you should see two new additions to your view – a Stop Order and a Limit Order.  These are the two items that will form your bracket.

oco-order

Step 3 – Adjust Your Price Points

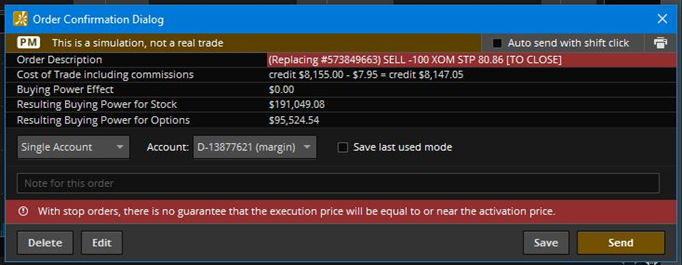
Adjust the Stop order and Limit order to your desired levels that you calculated in your trading plan.  Once you make a change, you will have a confirmation box that you must accept the changes to… click Send.

adjust-and-confirm-order

Review the 3 Steps to Creating an OCO Bracket

That’s all there is to it.  Now you have the freedom to go live your life because you know that if the stock rises up to your Limit price, your broker will sell it for you.  Also, you can rest assured that it the stock takes a turn and breaks down that your broker will sell for you at your Stop price.


Additional Viewing Options:

Would you like to view a video or presentation on this topic?
Check out this video on Youtube https://youtu.be/L0j8pFHaFys
Download the presentation on SlideShare https://www.slideshare.net/mikeauten/how-to-set-an-oco-bracket
Categories
Blog Education

How to Buy a Stock in 5 Simple Steps

If you’re thinking about becoming a stock market trader, you’re probably wondering about all of the things you’ll need to know to be successful. One of the first things to think about is knowing how to buy a stock. Here’s a quick walk-through to show you how to make a stock purchase using broker software.

5 Simple Steps to Buying a Stock

  1. Open Your Broker Software
  2. Search for the Stock
  3. Click the “Buy” button
  4. Review the Purchase Information
  5. Send the Order

There are actually 5 simple steps to buying a stock. While these steps are roughly the same, no matter what broker software you use, you may need to look up exactly how to do it in yours. For this example, we’ll use TD Ameritrade. Now, let’s review each step in more detail.

Step 1 – Open Your Broker Software

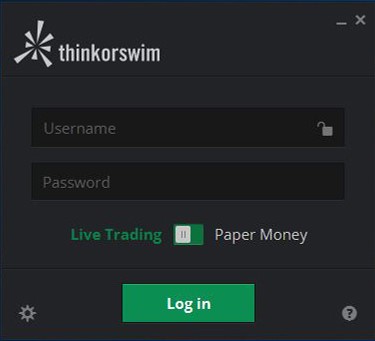
Open Your Broker Software – Seems simple enough. Open the Think or Swim platform and enter your username and password. If you just want to practice, you can choose the “Paper Money” option – but normally you would choose “Live Trading”. With everything entered in, click the Log In button to continue.

Step 2 – Search for the Stock

Select the Charts Tab

Select the Charts tab

Find the Stock

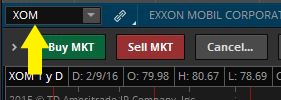
Find the stock you want to buy.

Now that the application is open, you need to make sure you are on the correct tab so you can find the stock you want to buy. Click on the Charts tab and then enter in the stock ticker to search for the stock. With most brokers, you will see your choices narrow with each letter you type in the search box. If you accidentally type it wrong, you will see that it can’t be found. Just back up and try it again.

Step 3 – Click the “Buy” button

Click the Buy Button

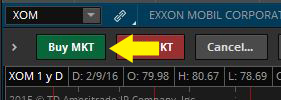
When you see the chart for the stock you want to buy, just click the “Buy MKT” button to start the purchase process. Keep in mind, in this example, you would be buying at the Market price (which may not be the price you wanted to buy at). You can edit the price in the next step.

Step 4 – Review the Purchase Information

Review the Purchase Information

You should always review the purchase information before executing your order. Make sure that you have the number of shares correct. It’s also a good idea to confirm the price you are buying at (unless it’s a market order). Also, check out the cost of the trade (including the commission being charged) so you know what it will cost you.

Step 5 – Send the Order

Send the Order

When all of the trade information is correct, the only thing left to do is to press the Send button and your order will be entered. Depending on the volume of orders, it may take some time to get filled.

Review the Chart

Review the Chart

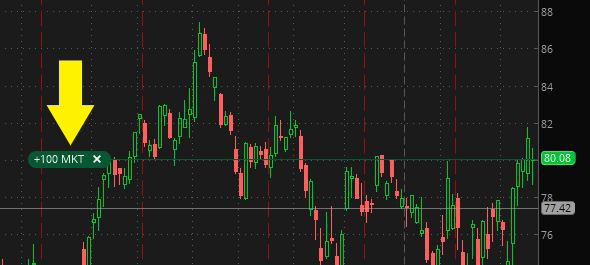
If everything went well, you should now have the trade referenced on your chart. That’s all there is to buying a stock.

Review the 5 Simple Steps to Buying a Stock

Now that you’ve been through the whole process, its simple to see that it’s just 5 simple steps. Opening your software, Finding the stock, Clicking the buy button, Reviewing the purchase information and sending the order.

Additional Viewing Options:

Would you like to view a video or presentation on this topic?

Categories
Blog

How to Market Using Social Media

I recently spoke at a conference for IAAP in Omaha Nebraska.  They have been working on building up their membership and wanted some insight on social media and marketing for a younger market.

You can download the presentation How-to-Market-Using-Social-Media to review.

Categories
Blog

A System to Evaluate Applicants for a Job

Earlier in the month I was asked to evaluate 10 different applicants for a position with a company.  I was given the job description and sent the resumes and asked to give a recommendation on the preferred applicants to interview.  Since the job preferred fundraising experience, and the applicants did not have direct experience with fundraising, I created a way to evaluate each applicant based upon other factors that are referenced in the job description.

I used the following four steps to rank the applicants based upon their suitability for the position:

Step 1 – Breakdown the Job Description into Tags

Read through each bullet point or each line of the job description and classify it with a tag or tags.  After reading through a few different lines, you should be able to do this with little experience.  Here are a few sample requirements from a job description:

  1. Secure financial support from individuals, foundations and corporations
  2. Manage the implementation of Software System and oversee staff responsible for data entry and gift processing
  3. Develop and maintain ongoing relationships with major donors
  4. Creating and executing a strategy for a large sustained base of annual individual donors
  5. Overseeing organization of special events
  6. Developing and tracking proposals and reports for all foundation and corporate fundraising

Reading through the first line, I would create a few different tags like “Finance, Sales”  Finance because it describes getting monetary support from people and Sales because that’s a sales process.  See, simple and straightforward.  Then I would move on to the next line and create tags like “Software (or name of software if it was specific), Manager, Data Entry, Gift Processing”  Each of these are the main points of the requirement.

After working through each of the lines above, I would have the following tags identified:

  1. Finance, Sales
  2. Implement Software, Project Manager, Finance, Manager, Data Entry, Gift Processing
  3. Customer Service, Relationships, Confidentiality, Sales
  4. Planning, Organizing, Strategy, Relationships
  5. Organizing, Event Planning
  6. Development, Organizing, Reports, Writing, Relationships, Sales

Using an actual job description, you will find that you will have lots more tags and lots more duplicate tags in different requirements.  This is just a sample to show you how to get started.  Now that we know all of the tags (for this example) lets move on to ranking the tags in order of importance.

Step 2 – Rank the Tags to Determine the Most Important Criteria for the Position

During this step, we identify which of the tags are most important – and thus should rank higher.  The thought process behind this step is that the higher ranked tags should have a bigger weight in the final formula.  The bigger weights will translate to a higher score for an applicant and thus equal a better applicant that is more suitable for the position.

Going through each item in the tag list, we will count how many times the tag appears in our listing.  Going back to our example above, Relationships is mentioned three times as is Sales.  Finance is listed twice and most others are just listed once.  After counting each of the tags by how many times they appear, you can rank them in order of most used to least used. If there is a tie between two or more, then decide which is more important to the position. This will result in a listing in order of Sales, Relationships, Organizing, Finance, Confidentiality, Development, Implement Software, Gift Processing, Manager, Planning, Strategy, Writing, Project Manager, Customer Service, Data Entry, Event Planning, Reports.  Now that we have that part out of the way, it’s time to review the resumes to see how many tags we can find.

Next part of this step is to assign a point value to each tag.  I normally list them from most used to least used and then assign a reversed number of points.  It should look like this:

Rank Tag Point Value
1 Sales 17
2 Relationships 16
3 Organizing 15
4 Finance 14
5 Confidentiality 13
6 Development 12
7 Implement Software 11
8 Gift Processing 10
9 Manager 9
10 Planning 8
11 Strategy 7
12 Writing 6
13 Project Manager 5
14 Customer Service 4
15 Data Entry 3
16 Event Planning 2
17 Reports 1

Feel free to change the values as you see fit.  You may want to weight some tags more than others depending on how often they are used, how important that requirement is, etc.

Step 3 – Breakdown the Resume into Tags

Grab the first resume in your list and start reading it line-by-line like you did with the job description.  Make sure to use the same list of tags you created in Step 1.  As you are evaluating the resume – you can make marks for whether or not their experience matches the tags you created.  If a line in the resume meets the tag – then they will qualify and you can move on to the next tag.  What you will find, if done correctly, is that not all applicants will meet each criteria.  If it doesn’t happen that way, then you should review your tags and make them more specific. After the first applicant, your list should look similar to this example:

Rank Tag Point Value Applicant #1 Results
1 Sales 17 x
2 Relationships 16
3 Organizing 15
4 Finance 14 x
5 Confidentiality 13
6 Development 12
7 Implement Software 11
8 Gift Processing 10 x
9 Manager 9
10 Planning 8 x
11 Strategy 7 x
12 Writing 6
13 Project Manager 5 x
14 Customer Service 4 x
15 Data Entry 3
16 Event Planning 2 x
17 Reports 1 x

Now you can simply add up the point values for each “X” and get a final score for the applicant.  In this example, Applicant #1 scored 68 out of 153.  That puts them at a 44% of meeting all criteria.  While its a bad idea to make determinations before all applicants have been evaluated, I would say this applicant is not very fit for the position.

Step 4 – Rank Each Applicant and Deliver Results

Now that you have seen the process on how to create tags from the job description, how to rank those tags on order of importance, and how to review resumes to see how well they meet the criteria, its time to rank all of the applicants to see which ones are the best qualified for the position.  Since you created totals in the last step, it will be easy to see the leaders.  In my experience, I have found that you will have 10% or so of the applicants rise above the rest – and those are the ones that I would suggest move forward in the process.  If you end up with no applicants or very few that come close to meeting any of your requirements, then you should reevaluate your criteria as it was probably too stringent.

In the end, I was able to rank all of the applicants and make a recommendation based upon the job description criteria and each candidates resume.  While it isn’t a fool-proof system, it atleast creates a systematic approach that can be replicated across a company.  It also attempts to take keep reviewers from just going with their gut – and following a process to determine suitability.

Categories
Blog

Partner with Experts

Working with Experts

When you are starting out in a new venture, you probably have a ton of questions about getting started. “How do I do this?” or “What happens when…”. You can spend lots of time searching for the answers that you need wasting countless hours of precious time or you can go talk to an expert.

Why do I need an expert?

For the same reason you should hire a plumber to fix a leaky pipe you should always hire an expert to help you build your business. While its great to be good at many things, its better to be an expert in working with subject matter experts towards a goal.

But experts are expensive!

The saying goes that it costs a lot of money to be cheap. What does this mean? It means that cutting corners, doing things you aren’t qualified to do, and making big mistakes can end up costing you lots of money. As an example, if you purchase a 40 unit apartment building without having a qualified inspector look it over you think you are saving a few hundred dollars. While you don’t have the proper skill or knowledge to look for all of the possible structural defects, you think you can save some money by doing it yourself. Then fast-forward a few months…after the first big rain shower. One of the walls of the building collapses. How much money is that going to cost to fix? How much is the inevitable lawsuit going to cost you? Add up all of these costs and you can easily see how much money it really costs to be cheap and cut corners.

How do I find an expert?

Finding experts isn’t near as difficult as you think. The best place to start is with your sphere of influence. The people that you know and talk to on a daily basis. Then move out to the farther reaches of your circle. Talk to your attorney, your accountant, or your doctor. Ask each of them if they know anyone who they would consider an expert in whatever field you are looking for. You’d be surprised at how many people know experts in many different areas. Sometimes, your doctor may play golf with an expert real estate attorney. If you are having trouble getting started, do an internet search for “experienced real estate attorney” and add in the town your are focusing on. That should return you lots of different names. Make a list of the names and start searching for each of them to see what others have said about them. You should be able to get enough information to narrow down your list and be able to interview the finalists to finally choose the expert you need.

From understanding why you need expert help to finding an expert to work with, all of these decisions are important for you to consider when you are starting your business. Have questions about how I hire experts to work with…let me know in the comments below.

Photo Credit: http://www.flickr.com/photos/homesbythomas/4938211707/

Categories
Blog

Setting and Achieving Your Investing Goals

Setting your investing goals is the only way to succeed. If you don’t have goals, you will waste a lot of time doing tasks or looking at projects that aren’t what you want or need. In order to keep focused, its important to follow the following 5 steps to setting and achieving your commercial real estate investing goals:

Step 1 – decide on your goals

Step 2 – create projects that will help you reach your goals

Step 3 – scope each of the projects to break them down into workable tasks

Step 4 – create major milestones based upon a timeframe

Step 5 – identify which of the projects should be included in each of the milestones

Step 6 – plan a timeline for milestones and for the projects and tasks in the first milestone

In a follow-up post I will go into further detail about each of these items. For now, let’s stay focused and continue.

Once you have gone through the process listed above you will have a roadmap for your success. Getting those items figured out is normally the toughest part. After you have everything properly defined, which you will be able to tell by the ease of which you complete tasks, you can start knocking items off of your list.

Now that we have taken a look at setting your investing goals, its time to focus on achieving them. Make sure that you are constantly updating your progress on your timeline. The faster you achieve each task, the faster you can get through each project. Obviously the faster you accomplish each project the sooner you can move through each milestone. Once you get finished with all of the items in a milestone, its time to prioritize the projects in the next milestone and look to adding items to your future milestone list. One thing to keep in mind is that once you start on a milestone, every project is locked in and should not change.

As you are busy working on each of your tasks in your projects, you will begin to get a feel for how many items you can get done in each milestone. This will help you plan for the future. It is much easier to figure out how much you can accomplish in each milestone once you get a feel for how much work each task item is in each project. While your process when you start out may not be very efficient, that should change the more projects you scope out and the more tasks you get finished.

All-in-all, its important to keep adding new projects to your timeline, scope the projects into easily understandable tasks, and to lock in a milestone once you start on it. If you keep setting achievable goals, set aside the proper amount of time to complete them, and keep striving to understand what system works for you; you will have no problem setting and achieving your investing goals.

If you’re interested in how I scope out projects or what steps I take to achieve my goals, send me an email and ask.